Painting with coloured ice cubes on paper to explore colour mixing and melting
Creative arts and design
Messy play
An adult lays a natural cloth on the table and slides a large sheet of thick paper on top. Two children stand close, watching as the adult sets down a small dish with a blue ice cube and a yellow ice cube, each on a lolly stick handle. One child grips the blue stick with both hands and makes a long, slow line; a watery trail spreads and begins to shine on the paper. The adult says, “Cold and wet,” and folds a cloth beside the child’s wrist when they pause to rub their fingers. The second child presses the yellow ice near the blue edge and both children lean in to look where the colours start to blur together.
This activity offers children a slow, sensory way to paint using coloured ice cubes as the “brush”. As the ice melts, children notice changing colour intensity, watery trails, and new colours appearing where colours meet. The pace naturally supports sustained attention and repeated experimentation without needing a finished product.
Step-by-Step Guidance
1. Prepare coloured ice cubes in advance by mixing water with food colouring in washed-out yoghurt pots. Place a lolly stick into each pot so it freezes as a handle.
2. Set up a wipeable surface with a tray or tuff tray underneath. Place large paper on top so children have space to make long strokes and watch colours meet.
3. Bring out a small selection of ice colours at first. Keep extras nearby so you can swap them in as they melt.
4. Invite children to choose an ice cube and try it on the paper. Model one slow stroke so children can see the watery trail and the colour change as it melts.
5. Allow time for repeated rubbing, tapping, dragging and pausing. If children start combining colours, name what you see in simple language (for example, “blue and yellow are meeting”).
6. Offer a fresh sheet of paper if children want to start again, or keep the same sheet for layering and mixing.
7. End by helping children notice the change in the ice (smaller, slippery, watery). Support handwashing and help children decide where to place the finished paper to dry.
Learning Objectives
This activity supports children to explore colour, change and simple cause-and-effect through first-hand sensory experience (Expressive Arts and Design; Understanding the World). Children may begin to use words, sounds or gestures to communicate choices and observations, such as naming colours or indicating “more” (Communication and Language). It also offers repeated practice for grip, hand control and bilateral coordination when holding, moving and swapping ice cubes (Physical Development).
Adult Role
Set the environment up so children can focus on the sensory experience without adults needing to manage constant spills. Introduce the materials calmly and then step back, letting children lead the pace and direction of their marks. Model language that matches what is happening in front of you: colour names, action words (rub, slide, drip), and simple change words (melting, cold, wet, lighter/darker). Scaffold only when it helps the child stay in the play, such as offering a cloth, swapping a melted cube, or showing how to hold the stick if hands are getting too cold. Stay close enough to supervise closely, especially with younger children, and use observation to decide whether a child needs a sensory break, a different grip option, or a new colour to extend their exploration.
Observation Cues
Notice whether children keep returning to the same colour or deliberately choose different ones.
Listen for colour language or early comparisons, such as “red”, “pink”, “dark”, “more”, “gone”, or “cold”.
Watch how children adjust pressure and speed as the ice becomes smaller or more slippery.
Notice moments of prediction or surprise, such as pausing before placing one colour on top of another.
Look for self-regulation signs: children asking for a cloth, moving away from the cold sensation, or persisting despite wet hands.
Observe social moments, such as offering a colour to a peer, copying a peer’s technique, or negotiating turns.
Time & Space
10–25 minutes, plus freezing time in advance and drying time for the paper.
Indoor table or floor space with a wipeable surface. A tray or tuff tray underneath is helpful to contain melting water. Access to a sink for handwashing.
Materials
Safety
Age adaptations
Budding Adventurers
Offer three to four colours and a second sheet of paper nearby so children can restart independently. Add a simple prompt through materials rather than instructions, such as placing two colours close together to invite mixing. Support turn-taking with a small “waiting” dish for cubes, and model emotion language if frustration appears when the ice melts quickly: “You wanted more. Let’s get another.”
Curious Investigators
Invite children to test what happens when colours overlap by providing two ice cubes at once and a larger shared sheet for collaborative painting. Add a simple challenge they can choose to take up, such as “Can you make a new colour?” without requiring a specific result. Encourage children to describe what they notice about melting and dripping, and record their words on a sticky note to place beside the drying artwork.
Confident Discoverers
Offer a wider palette and give children more control over planning by placing colours in a clear order (for example, warm colours together, cool colours together). Provide options for mark-making tools alongside the ice, such as a paintbrush to move the coloured water, so children can compare effects. Encourage children to explain their process to a peer (“I mixed these two”) and to decide when their painting feels finished, supporting independence and sustained focus.
EYFS Links
Communication and Language: Adults can model and respond to children’s attempts to name colours, request a new cube, or describe what they notice (“melting”, “drip”), building vocabulary in a real context.
Physical Development: Holding a stick handle, changing grip as the ice shrinks, and making controlled strokes supports hand strength, coordination and early tool control.
Understanding the World: Children experience change over time as the ice melts and see cause-and-effect when pressure and speed alter the marks; they also notice simple colour mixing as materials combine.
Expressive Arts and Design: Children explore colour, line, layering and pattern in an open-ended way, making choices about where to place marks and how to combine colours.
Ethos adaptations

Set out one individual tray on a low shelf with a single large sheet of paper flat inside. Offer only two yoghurt pots, each holding one coloured ice cube with a lolly stick, arranged left to right; keep other colours out of sight, and place a folded cloth at the top corner. Position the tray or tuff tray to catch drips so trails, puddles and paper saturation make pressure, speed and time visible to the child.
Give one slow, quiet demonstration: lift the first stick, make three left‑to‑right strokes, pause to watch melting, cross once with the second colour, return sticks to their pots, blot once. Step back, limit language to brief safety or single‑word labels if needed, and avoid questions. Watch for steady grip as ice shrinks, controlled strokes, repetition, crossing lines to mix, noticing melt and drips, and any attempts to name colours or request more.

In an outdoor or nature-integrated space, lay large sheets of paper on low tables, a cleared patch of grass, or a sheltered patio so melting runs naturally onto the ground rather than a pristine table. Materials such as coloured ice cubes frozen in the provided washed-out yoghurt pots, lolly sticks as handles, water and food colouring, and a tray for extra drips are provided in an open-ended way rather than pre-arranged; cloths or paper towels sit ready for children to fetch as needed. Children may work at their own pace, repeating strokes and experimenting with layering and melting.
The adult observes from nearby, checking safety of the surface and the stability of paper and trays, then steps back to offer minimal, responsive prompts such as single words or short questions. The adult ties off overt instruction, intervening only to manage slippery areas or to help exchange an empty ice pot, while the adult models calm handling when needed. Children choose where to place ice, how long to press, when to swap sticks and may narrate or gesture about colour changes as the adult responds briefly.

Set up several low trays across the table with large sheets of paper taped loosely so children can choose workspaces; place coloured ice cubes made in washed-out yoghurt pots still grouped in shallow dishes so they are visible and reachable rather than handed out. Include varied paper sizes and spare cloths within easy reach so the child may switch surfaces or wipe and return. Materials remain open-ended: ice cubes, lolly-stick handles, paper and trays invite multiple uses, layering, pauses and return visits while the melting process shapes the play.
The adult stays back as observer and co-researcher, offering reflective commentary such as "I can see the blue is getting lighter" or "You’re trying to move the cube slowly" and occasional prompts like "What happens if you press here?" without giving steps. The child may select cubes, change grip as ice shrinks, mix colours where marks meet, or leave areas unstroked; the adult notices sustained attention, repeated strokes, verbal labels or gestures for "more," and changing hand control, documenting these moments through notes or photos embedded in the flow.
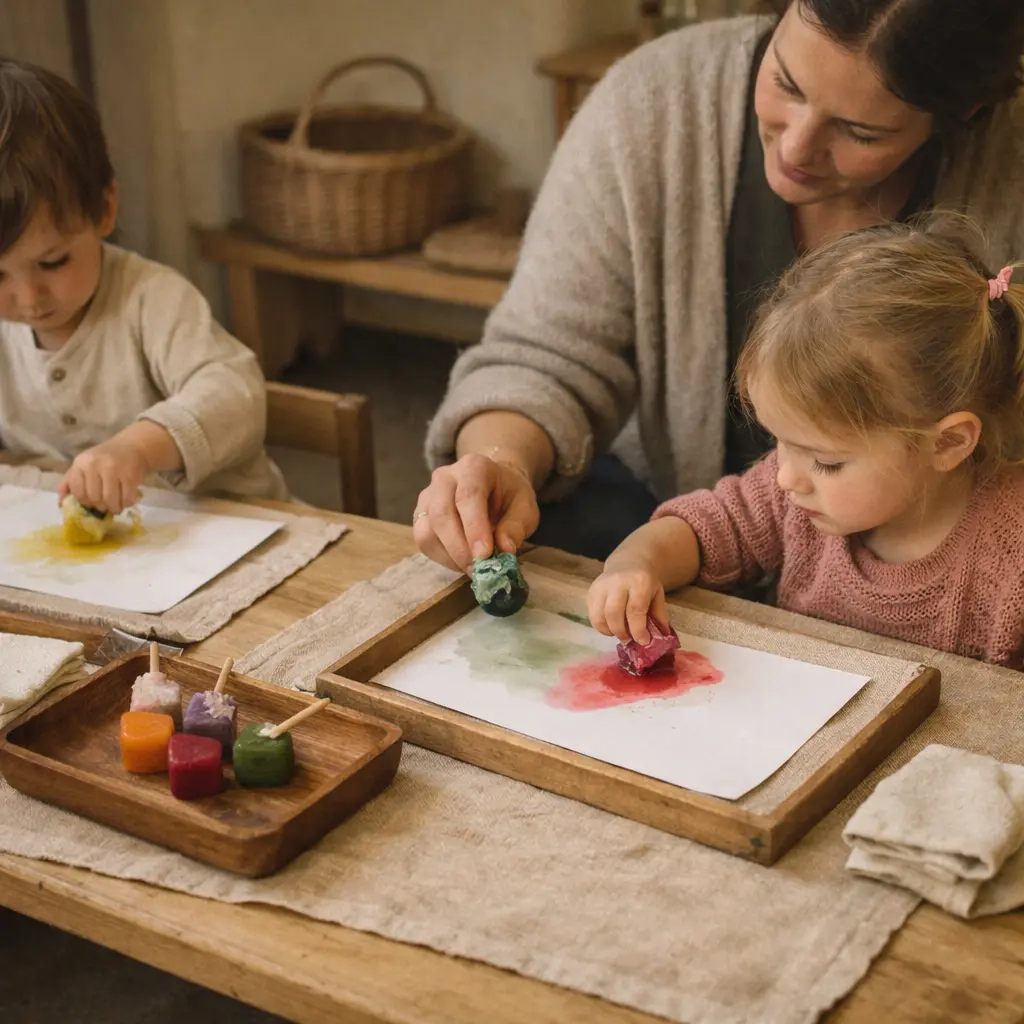
Steady, contained workspaces are prepared: a neutral cloth defines each child’s area on a low table with one shallow wooden tray to catch drips and a single sheet of paper. Only a small number of ice cubes are provided, frozen in metal or wooden moulds using diluted natural colourants such as beet, spinach or turmeric infusions; wooden sticks or natural-fibre cloths serve as handles. Bright or plastic items are removed so the palette and textures remain calm and limited, and spare cloths for safety sit at the tray edge.
The adult demonstrates holding and moving an ice cube slowly, remaining close, quiet and observant rather than giving step-by-step instruction, intervening only for safety or to model a gentler grip. The child returns to making repeated strokes, noticing melting, colour intensity and mixing at their own pace, using words, sounds or gestures to name observations; the adult mirrors vocabulary sparingly and follows the child’s rhythm while keeping the space orderly.